ROOF: clay tiles
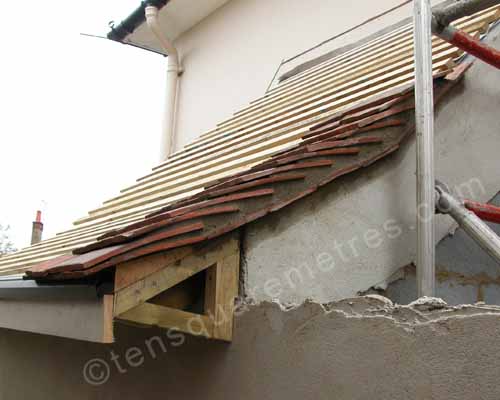
It doesn't really get any easier as you progress with a project like this. You get the hang of one thing and then it's straight on to something totally different. Next up was the tiling. The main run of tiling was easy. Once all the batons are in place you just hook the nibs on and fix the tiles with a nail. The difficult bits were the hipped corner and the bedded verge. Both these features involved cementing the tiles in place and the hip bonnets needed cut tiles either side to make the angles. There was also the lead flashing at the top. It wasn't immediately obvious in which order I should do all this but luckily I got some guidance from my local roofing supplier. I was advised to do the ends and the top first, then fit the lead flashing while I could still climb on the batons rather than the tiles. I could then work across into the middle finish with the cuts at the hip.
 July 2009: The upturned tiles along the bedded verge. You can also see the end of the wooden tilting fillet. A bedded verge finishes the tiles at a gable wall with a slight lip.
A bedded verge finishes the tiles at a gable wall with a slight lip. It also lifts the tiles slightly to channel the water away from the edge. You create this by cementing some tiles face down along the edge. The first line of tiles are also bedded in cement. There is useful guide to tiling on The Clay Roof Tile Council website. There are lots of diagrams showing the various layers of roof features and examples of finished tiling. There is a diagram of a bedded verge on page 25.
I was advised to nail the bottom three rows of tiles and then every third row after that. I used 40 mm aluminium clout nails (one per tile). Before I started the tiling I cut a slot in the wall at the top for the flashing. The lead tucks in at the top to make a watertight join. You can fill this with mortar but I used "Flashpoint" which is a grey plastic sealer. The tiles on the slope by the house have "soakers" underneath them. There are various ways to do this such as a "secret gutter" but the simplest solution seemed to be with aluminium soakers. These are just overlapping angled sheets that sit under the lead and tiles to help channel water away from the wall.
 July 2009: The tiling is started with the cut groove at the top for the lead flashing. The lead flashing tucks in at the top to make a watertight join.
I installed the bedded verge on the other side as per the Tile Council diagram. Both ends of the roof needed alternating tile-and-halves. I then fixed my row of tiles across the top so I could fit the lead flashing and seal it in with the Flashpoint. I cut the lead to size by scoring it with a stanley knife and bending it back and forth. This was how they cut it in the shop. I formed the lip to tuck into the slot by tapping the lead over a piece of wood. It was quite easy to lift the top tiles up and slide the others underneath as I worked across towards the hip. I just pushed the lead back down as I went along.
The hip was the tricky bit. I found it quite difficult to get the cement to stay in the bonnets without sagging and leaving a gap. Also, my reclaimed hip bonnets weren't exactly right for my pitch of roof so I had to cut all the joining tiles at an angle. At the tip of the corner there is a "hip iron". I thought this was just a decorative twirl but apparently they are there to stop the bonnets slipping off and hitting you on the head. They are like a long bracket that you nail to the hip rafter. The end bonnet has a couple of horizontal bits of tile set in the cement. I think these bits actually are decorative. I just copied them from the other side of the house.
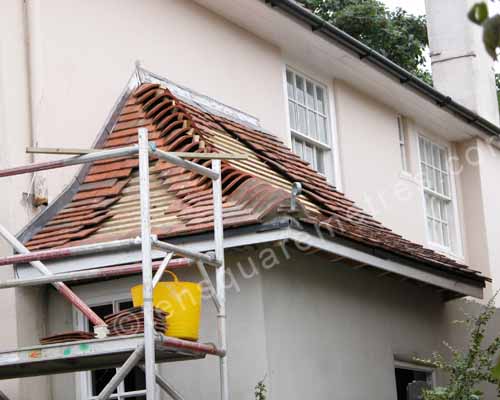 July 2009: I needed to position the hip bonnets in order to fit the lead flashing at the top.
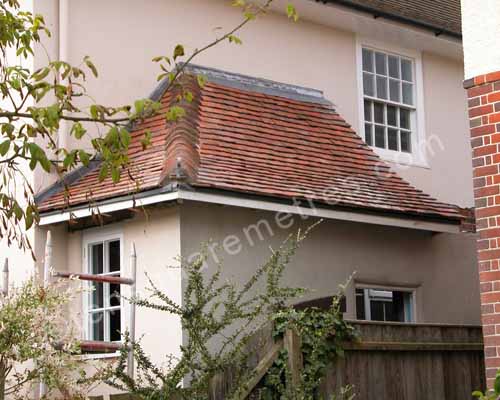 August 2009: The finished clay tiles.
If you have found this website useful please tweet / like / etc... and pass it on!
© 2010- tensquaremetres.com | Privacy | Search | Contact | About